How to Make a Watermark for Your Art Coral Paintshop Pro 2018
Why Add Watermarks to Your Images?
To larn the benefits of adding watermarks to your images and to find out what information you should include and where to place the watermark, please read What is the Purpose of a Watermark? The Benefits of Watermarking Photos.
How to Watermark a Photo
Step 1
Open Paint Shop Pro Photograph X2.
Create a new image in one of three ways:
· select File, and so New… from the drib down menu
· click on the blank paper icon located in the top left corner (nether File)
· or printing Ctrl + Northward on your keyboard.
You'll now accept a window open, called New Image.
(Click to enlarge)
Footstep two
In this window, you lot will notice three options under Image Characteristics: namely Raster Background, Vector Background and Fine art Media Background. For creating a simple text watermark, information technology doesn't actually matter which y'all cull. I'grand going to select Vector Background. If you like, take the information from the screenshot to a higher place and re-create information technology into your window.
The Image Dimensions can be set to whatever you like. This determines how large your workspace is.
Regardless of what settings you decide, the only matter you need to be certain of is that the image background is transparent. To do this, bank check to encounter that the transparent box is selected, or, if you're using Art Media Background, make sure the Enable fill color box is unchecked.
Once you have everything to your liking, click on OK.
Pace 3
Next, select the Text Tool past either clicking on the text icon from the toolbar on the left or by only typing the letter t on your keyboard.

Click somewhere inside your image background to activate the Text Tool. This will be where the text is placed. Once you do this, a new window volition open called Text Entry.

Type the text that you lot want to include in your watermark.
If you'd similar to include the copyright symbol (©), the keyboard shortcut for Windows is Alt + 0169. Using the number keys that are above the letter keys will not piece of work, you must use the numeric keypad to the left of your keyboard.
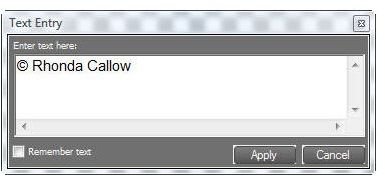
At present, customize the text to your liking. Highlight the text within the box that you wish to modify. If y'all'd similar the changes to be practical to all of the text within the box, elementary click Ctrl + A on your keyboard.
Once your text is highlighted, you lot can modify the font and size by selecting your preferences from the dropdown menu located in the toolbar in a higher place your image.

You lot can likewise alter the text colour using the options in the Materials box on the right of the main window.

When everything is to your liking, click on Employ in the Text Entry box.
Stride iv
The next step is to get rid of the extra groundwork. Yes, it's transparent, simply we want to cut it downwards so when it's placed on a photo, it can be placed close to the corner without difficulties.
To do this, select the Crop Tool by clicking on the crop icon to the left or by typing r on your keyboard.

Be sure the ingather tool is fix to complimentary form, and suit the crop surface area to surround your text. Click on the green checkmark to complete the crop.

Step 5
We're at present ready to save our image. Information technology will demand to be saved as either a PNG file or a GIF file and so we don't lose our transparent background. To do this, select File, and then Relieve Equally… from the drop down menu (or F12 on your keyboard).
Select the correct file format from the list, navigate to where you'd like your image saved to on your computer and change the file name to your liking.
Click on Relieve. You're done!
Additional Tutorials
Did you observe this tutorial helpful? Bright Hub'due south Digital Photography channel has several Paint Shop Pro tutorials ideal for beginners and advanced users! Y'all'll detect resource on everything from using layers to reviews of the best free plugins compatible with Paint Store Pro by visiting our master list of Paint Shop Pro tutorials and resources.
This post is role of the series: Watermarks and Corel Paint Store Pro Photograph X2
Creating and adding a watermark to your digital photos is really quite simple. This tutorial series will teach you how using Corel Paint Store Pro Photograph X2.
- How to Watermark a Photo in 5 Easy Steps with Corel Paint Shop Pro
- How to Add together a Watermark to Your Images Using Corel Paint Shop Pro Photo X2
sullivanhasky1985.blogspot.com
Source: https://www.brighthub.com/multimedia/photography/articles/10272/
0 Response to "How to Make a Watermark for Your Art Coral Paintshop Pro 2018"
Post a Comment